Building Your First MCP Server: A Weather Forecast Integration

Updated 2026-02-05
In my Agent Skills tutorial, I showed how to build a weather forecast capability using Anthropic's lightweight skills format. Today, we'll build the same weather service as an MCP server—demonstrating the architectural differences and production-ready approach of the Model Context Protocol.
While Agent Skills offer simplicity and filesystem-based discovery, MCP servers provide process isolation, network-level integration, and enterprise-ready deployment patterns. By using the same weather API example, you'll see exactly how these two approaches differ in practice.
What is MCP?
The Model Context Protocol (MCP) is an open standard that enables AI applications to securely access external data sources and tools. Think of it as "USB-C for AI"—a universal interface that lets LLMs discover and interact with your services in a standardized way.
Key Concepts (Spec 2025-11-25)
MCP defines three main capabilities:
- Tools: Functions the LLM can invoke (like API calls)
- Resources: Data the LLM can read (like files or API responses)
- Prompts: Reusable templates for common workflows
Unlike Agent Skills that run in the client's process, MCP servers are independent processes communicating via JSON-RPC 2.0 over:
- stdio: Local development, spawned by clients
- HTTP/SSE: Remote servers, cloud deployments
Why MCP for Production?
Comparing to Agent Skills:
| Aspect | Agent Skills | MCP Server |
|---|---|---|
| Execution | In-process scripts | Separate process |
| Isolation | Shared environment | Process boundaries |
| Security | Client's credentials | Scoped credentials |
| Distribution | Filesystem copy | npm/PyPI package |
| Transport | Local filesystem | stdio or HTTP |
| Deployment | Client-managed | Independent service |
When to use MCP:
- Production deployments with SLAs
- Third-party integrations requiring isolation
- Multiple clients accessing the same service
- Organizational security policies
- Services requiring authentication/authorization
Project Setup
We'll build the same weather forecast server from the Agent Skills tutorial, but as a proper MCP server using Python and UV.
Directory Structure
mkdir weather-mcp-server
cd weather-mcp-server
uv init --lib
Dependencies
Update pyproject.toml:
[project]
name = "weather-forecast-mcp-server"
version = "1.0.0"
description = "MCP server for weather forecasts using the National Weather Service API"
authors = [
    { name = "Nils Friedrichs" }
]
readme = "README.md"
license = { text = "MIT" }
requires-python = ">=3.10"

dependencies = [
    "mcp[cli]>=1.2.0",
    "httpx>=0.28.0",
]

[project.urls]
Homepage = "https://friedrichs-it.de/blog/weather-forecast-api-as-stdio-python-mcp-server"
Repository = "https://github.com/slin-master/weather-forecast-mcp-server"

[build-system]
requires = ["hatchling"]
build-backend = "hatchling.build"

[tool.hatch.build.targets.wheel]
packages = ["src/weather_forecast_mcp_server"]

[tool.hatch.build.targets.sdist]
include = [
  "src/weather_forecast_mcp_server",
  "README.md",
  "pyproject.toml",
]
Install dependencies:
uv sync
Implementing the MCP Server
Create src/weather_forecast_mcp_server/server.py:
#!/usr/bin/env python3
"""
Weather forecast MCP server using National Weather Service API.
"""
from typing import Any
import httpx
from mcp.server.fastmcp import FastMCP

# Initialize MCP server
mcp = FastMCP("weather-forecast-mcp-server")

# Constants
NWS_API_BASE = "https://api.weather.gov"
NOMINATIM_BASE = "https://nominatim.openstreetmap.org"
USER_AGENT = "WeatherMCPServer/1.0"


@mcp.tool()
async def geocode_city(city_name: str) -> dict[str, Any]:
    """
    Convert a city name to geographic coordinates.

    Args:
        city_name: City name (e.g., "San Francisco, CA" or "Portland, Oregon")

    Returns:
        Dictionary with lat, lon, and display_name, or error message
    """
    async with httpx.AsyncClient() as client:
        try:
            response = await client.get(
                f"{NOMINATIM_BASE}/search",
                params={
                    "q": city_name,
                    "format": "json",
                    "limit": 1,
                    "countrycodes": "us"  # NWS is US-only
                },
                headers={"User-Agent": USER_AGENT},
                timeout=10.0
            )
            response.raise_for_status()

            results = response.json()
            if not results:
                return {"error": f"City not found: {city_name}"}

            location = results[0]
            return {
                "lat": float(location["lat"]),
                "lon": float(location["lon"]),
                "display_name": location["display_name"]
            }
        except httpx.HTTPError as e:
            return {"error": f"Geocoding failed: {str(e)}"}


@mcp.tool()
async def get_forecast(latitude: float, longitude: float) -> dict[str, Any]:
    """
    Get weather forecast for specific coordinates.

    Fetches current conditions, 7-day forecast, hourly predictions,
    and active weather alerts from the National Weather Service.

    Args:
        latitude: Latitude in decimal degrees
        longitude: Longitude in decimal degrees

    Returns:
        Dictionary containing location info, current conditions,
        forecast periods, hourly data, and active alerts
    """
    async with httpx.AsyncClient() as client:
        try:
            # Step 1: Get grid point metadata
            points_response = await client.get(
                f"{NWS_API_BASE}/points/{latitude},{longitude}",
                headers={"User-Agent": USER_AGENT},
                timeout=10.0
            )

            if points_response.status_code == 404:
                return {
                    "error": "Location not covered by National Weather Service. "
                             "This API only supports US territories."
                }

            points_response.raise_for_status()
            points_data = points_response.json()

            # Step 2: Fetch forecast and hourly data
            forecast_url = points_data["properties"]["forecast"]
            hourly_url = points_data["properties"]["forecastHourly"]

            forecast_response = await client.get(
                forecast_url,
                headers={"User-Agent": USER_AGENT},
                timeout=10.0
            )
            forecast_response.raise_for_status()
            forecast_data = forecast_response.json()

            hourly_response = await client.get(
                hourly_url,
                headers={"User-Agent": USER_AGENT},
                timeout=10.0
            )
            hourly_response.raise_for_status()
            hourly_data = hourly_response.json()

            # Step 3: Check for active alerts
            alerts_response = await client.get(
                f"{NWS_API_BASE}/alerts/active",
                params={"point": f"{latitude},{longitude}"},
                headers={"User-Agent": USER_AGENT},
                timeout=10.0
            )
            alerts_response.raise_for_status()
            alerts_data = alerts_response.json()

            # Extract current period
            current_period = forecast_data["properties"]["periods"][0]

            return {
                "location": {
                    "lat": latitude,
                    "lon": longitude,
                    "city": points_data["properties"]["relativeLocation"]["properties"]["city"],
                    "state": points_data["properties"]["relativeLocation"]["properties"]["state"]
                },
                "current": {
                    "temperature": current_period["temperature"],
                    "temperatureUnit": current_period["temperatureUnit"],
                    "windSpeed": current_period["windSpeed"],
                    "windDirection": current_period["windDirection"],
                    "shortForecast": current_period["shortForecast"],
                    "detailedForecast": current_period["detailedForecast"]
                },
                "forecast": {
                    "periods": forecast_data["properties"]["periods"][:7]
                },
                "hourly": {
                    "periods": hourly_data["properties"]["periods"][:24]
                },
                "alerts": [
                    {
                        "event": alert["properties"]["event"],
                        "headline": alert["properties"]["headline"],
                        "severity": alert["properties"]["severity"],
                        "urgency": alert["properties"]["urgency"]
                    }
                    for alert in alerts_data.get("features", [])
                ]
            }

        except httpx.HTTPError as e:
            return {"error": f"API error: {str(e)}"}
        except (KeyError, IndexError) as e:
            return {"error": f"Unexpected API response format: {str(e)}"}


@mcp.tool()
async def get_alerts(latitude: float, longitude: float) -> dict[str, Any]:
    """
    Get active weather alerts for a location.

    Args:
        latitude: Latitude in decimal degrees
        longitude: Longitude in decimal degrees

    Returns:
        Dictionary with list of active alerts or error message
    """
    async with httpx.AsyncClient() as client:
        try:
            response = await client.get(
                f"{NWS_API_BASE}/alerts/active",
                params={"point": f"{latitude},{longitude}"},
                headers={"User-Agent": USER_AGENT},
                timeout=10.0
            )
            response.raise_for_status()
            alerts_data = response.json()

            alerts = [
                {
                    "event": alert["properties"]["event"],
                    "headline": alert["properties"]["headline"],
                    "description": alert["properties"]["description"],
                    "severity": alert["properties"]["severity"],
                    "urgency": alert["properties"]["urgency"],
                    "onset": alert["properties"]["onset"],
                    "expires": alert["properties"]["expires"]
                }
                for alert in alerts_data.get("features", [])
            ]

            return {
                "count": len(alerts),
                "alerts": alerts
            }

        except httpx.HTTPError as e:
            return {"error": f"Failed to fetch alerts: {str(e)}"}
Understanding the Code
FastMCP Decorator Pattern:
@mcp.tool()automatically registers functions as MCP tools- Type hints define the input schema (JSON Schema generation)
- Docstrings become tool descriptions for the LLM
- Return values are automatically serialized to JSON
Async/Await:
- MCP servers use async I/O for efficient request handling
httpx.AsyncClientfor non-blocking HTTP requests- Multiple API calls can run concurrently
Error Handling:
- Network errors return structured error messages
- 404 responses provide helpful context (US-only coverage)
- Try-except blocks prevent server crashes
Testing Locally
Start the Server (stdio)
Using uv run
uv run mcp run src/weather_forecast_mcp_server/server.py
Or after installing
uv pip install -e .
mcp run weather-forecast-mcp-server
The server is now running and waiting for stdio connections.
Testing with MCP Inspector
The MCP Inspector provides a web UI for testing servers:
Install inspector globally
npm install -g @modelcontextprotocol/inspector
Connect to your server
npx @modelcontextprotocol/inspector uv run mcp run src/weather_forecast_mcp_server/server.py
Open http://localhost:5173 in your browser. You should see:
- Connect: Server initializes successfully
- Tools tab: Three tools listed (
geocode_city,get_forecast,get_alerts) - Test tools: Click "geocode_city", enter "Seattle, WA", see results

Using with Claude Desktop
Add to ~/.config/claude/claude_desktop_config.json:
Claude Desktop: Settings → Developer → Edit Config
{
  "mcpServers": {
    "weather": {
      "command": "uv",
      "args": [
        "--directory",
        "/absolute/path/to/weather-forecast-mcp-server",
        "run",
        "mcp",
        "run",
        "src/weather_forecast_mcp_server/server.py"
      ]
    }
  }
}
Make sure uv is in your system PATH. You can verify by running which uv in your terminal. Also ensure the absolute path to your server is correct.
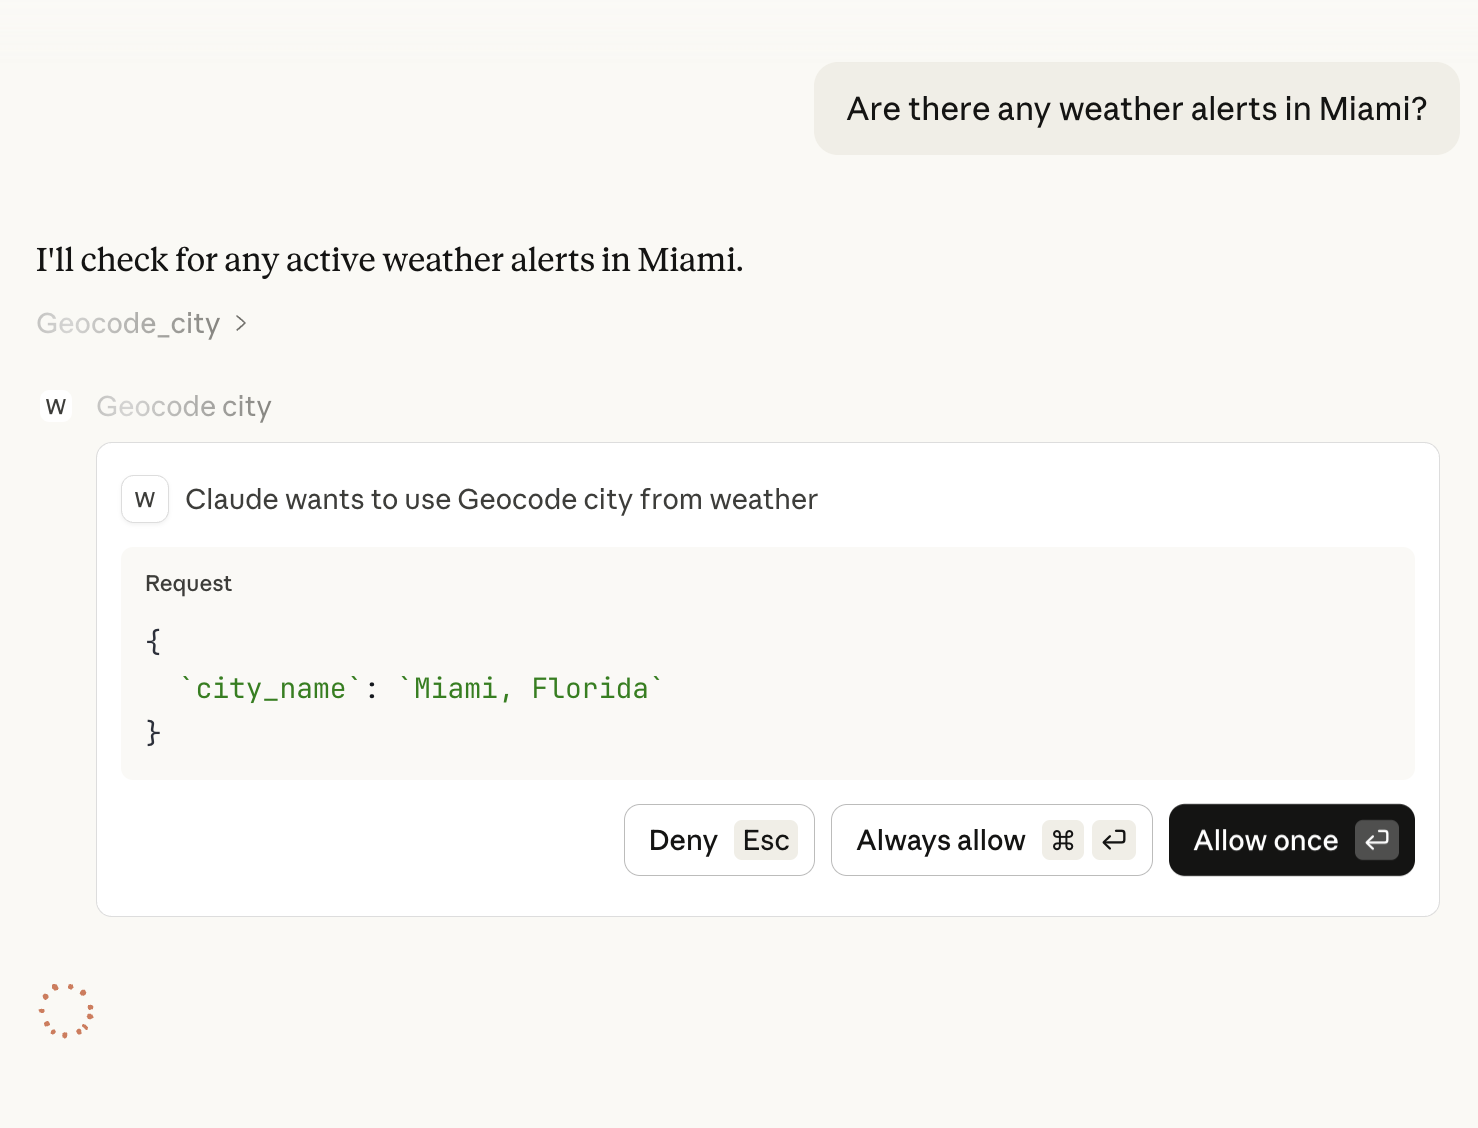
Restart Claude Desktop, then ask:
- "What's the weather in Portland, Oregon?"
- "Are there any weather alerts in Miami?"
Claude will use your MCP server via stdio transport!
Containerizing for Production
While stdio works great locally, production deployments often require Docker for isolation, reproducibility, and security.
Why Docker for MCP Servers?
- Process Isolation: Complete separation from host system
- Dependency Management: No conflicts with system packages
- Security Boundaries: Limit filesystem and network access
- Reproducibility: Same environment everywhere (dev/staging/prod)
- Easy Deployment: Ship to any Docker host or Kubernetes cluster
Dockerfile
Create Dockerfile:
FROM ghcr.io/astral-sh/uv:python3.12-bookworm-slim

# Set working directory
WORKDIR /app

# Copy dependency files first (for layer caching)
COPY pyproject.toml ./
COPY uv.lock ./
COPY README.md ./

# Install dependencies
RUN uv sync --frozen --no-dev

# Copy source code
COPY src ./src

# Create non-root user for security
RUN useradd -m -u 1000 mcpuser && \
    chown -R mcpuser:mcpuser /app

USER mcpuser

# Expose port for HTTP transport (if using)
EXPOSE 8000

# Default to stdio transport
CMD ["uv", "run", "mcp", "run", "src/weather_forecast_mcp_server/server.py"]
Docker Compose
For easier management, create docker-compose.yml:
services:
  weather-mcp:
    build: .
    container_name: weather-mcp-server
    restart: unless-stopped

    # For stdio: not needed (spawn container per request)
    # For HTTP: expose port
    ports:
      - "8000:8000"

    # Resource limits
    deploy:
      resources:
        limits:
          cpus: '0.5'
          memory: 512M

    # Security options
    security_opt:
      - no-new-privileges:true
    read_only: true
    tmpfs:
      - /tmp

    # Health check
    healthcheck:
      test: [ "CMD", "python", "-c", "import sys; sys.exit(0)" ]
      interval: 30s
      timeout: 10s
      retries: 3
Build and Test
Build image
docker compose build
Run container
docker compose up -d
Test stdio locally
docker compose exec weather-mcp uv run mcp run src/weather_forecast_mcp_server/server.py
View logs
docker compose logs -f weather-mcp
Security Best Practices
The Dockerfile implements several security measures:
✅ Non-root user: Runs as mcpuser (UID 1000)
✅ Read-only filesystem: Prevents modification of container files
✅ No new privileges: Disables privilege escalation
✅ Resource limits: CPU and memory constraints
✅ Minimal base image: Reduces attack surface
HTTP Transport (Optional)
For remote access or multi-client scenarios, use HTTP transport:
Update server.py:
if __name__ == "__main__":
    import sys

    # Check for transport argument
    if "--http" in sys.argv:
        # HTTP transport on port 8000
        mcp.run(transport="http", host="0.0.0.0", port=8000)
    else:
        # Default stdio transport
        mcp.run()
Update Dockerfile CMD:
CMD ["uv", "run", "python", "src/weather_mcp/server.py", "--http"]
Client configuration for HTTP:
{
  "mcpServers": {
    "weather": {
      "url": "http://localhost:8000/mcp",
      "transport": {
        "type": "http"
      }
    }
  }
}
Comparing to Agent Skills
Let's revisit the architectural differences with our concrete example:
Same Weather API, Different Architecture
Agent Skills (weather-forecast-skill/):
~/.claude/skills/weather-forecast/
├── SKILL.md                 # Instructions + metadata
├── scripts/
│   ├── geocode.py          # Python script (runs in-process)
│   └── get_forecast.py     # Python script (runs in-process)
└── references/
    └── NWS_API.md          # Documentation
MCP Server (weather-mcp-server/):
weather-mcp-server/
├── src/weather_mcp/
│   └── server.py           # MCP server (separate process)
├── pyproject.toml          # Dependencies + metadata
├── Dockerfile              # Container definition
└── docker-compose.yml      # Orchestration
Execution Flow Comparison
Agent Skills:
- Claude reads
SKILL.mdfrom filesystem - Claude spawns subprocess:
python scripts/geocode.py "Seattle" - Script runs in Claude's Python environment
- Output returned via stdout
- Claude parses JSON and uses result
MCP Server:
- Claude connects to MCP server (stdio or HTTP)
- Claude calls tool:
geocode_city(city_name="Seattle") - Server executes in separate process
- Result returned via JSON-RPC
- Claude receives structured response
Decision Matrix
| Use Case | Agent Skills | MCP Server |
|---|---|---|
| Personal productivity | ✅ Perfect | ⚠️ Overkill |
| Rapid prototyping | ✅ Fastest | ⚠️ More setup |
| Production SaaS | ❌ No isolation | ✅ Production-ready |
| Multi-tenant | ❌ Shared env | ✅ Process isolation |
| Enterprise deployment | ❌ Security concerns | ✅ Containerized |
| Remote clients | ❌ Filesystem-bound | ✅ HTTP transport |
| Third-party code | ❌ Trust required | ✅ Sandboxed |
Choose Agent Skills when:
- Building for personal use
- Rapid iteration is priority
- You control all code
- Filesystem-based discovery is sufficient
Choose MCP Server when:
- Deploying to production
- Multiple clients need access
- Security isolation is required
- You need HTTP/network transport
- Containerization is necessary
Next Steps
Now that you've built a production-ready MCP server:
- Add authentication: Implement API key validation for HTTP transport
- Add caching: Store recent forecasts in Redis to reduce API calls
- Add resources: Expose weather history as MCP resources
- Add prompts: Create templates for common weather queries
- Monitor performance: Add logging and metrics (Prometheus, Grafana)
- Publish your server: See our upcoming guide on MCP Registry publishing
Learn More
- MCP Specification 2025-11-25
- MCP Python SDK Documentation
- Agent Skills vs MCP Security Comparison
- Submit to LightNow.ai Registry
Conclusion
By building the same weather forecast service as both an Agent Skill and an MCP server, we've seen the architectural trade-offs in practice:
Agent Skills excel at simplicity and rapid development—perfect for personal workflows and trusted code you control.
MCP servers provide production-grade isolation, security boundaries, and deployment flexibility—essential for enterprise use cases and third-party integrations.
The beauty of the ecosystem is that you can start with Agent Skills for prototyping, then graduate to MCP when you need production features. Both approaches are valuable, and understanding when to use each makes you a better AI infrastructure developer.
Ready to dive deeper? Continue with the second part of the tutorial about MCP Server Resources, check out my Agent Skills tutorial to see the other side of this comparison, or read about security architectures to understand the implications of each approach.